Me and other guys from S.P.R.I.Te., with the help of professors from Unibo had the chance of working on Game as a Lab, a project made by students for students to teach game programming patterns and principles. Yesterday I had the chance to make my first lecture about Unity3d, in this and the next blog posts I'm gonna share materials of the course, hoping to help some passenger.
This tutorial is the first basic tutorial from Unity, you can find the video version of it here.
Index
- Introduction to Unity
- Basics
- Scene Navigation
- Gameobject and Component
- Order of execution
- Design
- Agent abstraction
- Tutorial 1 - Roll a ball
- Introduction
- Design
- Rough architecture
- Agent abstraction
- Let’s do this!
- Setting up the scene
- Moving the player
- Moving the camera
- Creating pick-up objects
- Collecting and counting
Introduction to Unity
Unity is a powerful engine with a variety of tools that can be utilised to meet your specific needs. The editor is intuitive and customisable allowing you a greater freedom in your workflow.
As a game development framework Unity is capable of being platform independent, since he natively uses both OpenGL and DirectX to build his game. Currently supported platforms are: Windows PC, Linux, Mac, Android, iOs, Playstation and so on.
Unity Basics
The main editor window is made up of several tabbed panels known in Unity as Views. There are several types of Views in Unity - they all have specific purposes which are described in this section.
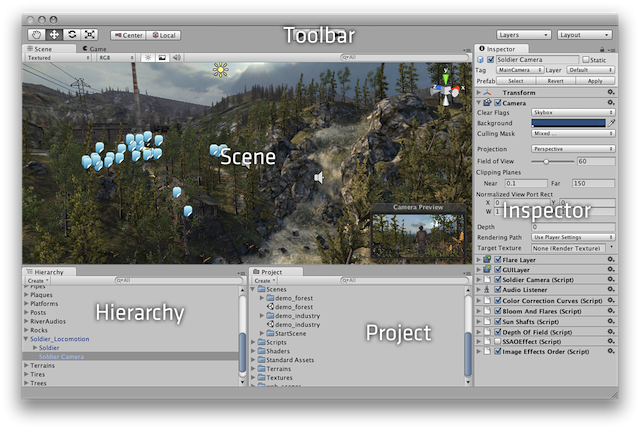 You can customize your Layout of Views by click-dragging the Tab of any View to one of several locations. Dropping a Tab in the Tab Area of an existing window will add the Tab beside any existing Tabs. Alternatively, dropping a Tab in any Dock Zone will add the View in a new window.
You can also setup your workspace by using the Layout tab in the upper right corner, personal favourite setting is achieved by pressing 2 by 3 and moving Project window below the Hierarchy. You can save your layout using the same tab.
Scene Navigation
Moving into the scene could be a little tricky for people who never used a 3d graphics tool, we will master it with time during the tutorial.
Selection
Right click of the mouse on the scene is used to select an object.
Arrow Movement
You can use the Arrow Keys to move around the scene as though “walking” through it. The up and down arrows move the camera forward and backward in the direction it is facing. The left and right arrows pan the view sideways. Hold down the Shift key with an arrow to move faster.
Focusing
You can focus on a GameObject by selecting it in the Hierarchy and then press double F or double clicking it.
Scene Gizmo

You can click on any of the arms to snap the Scene View Camera to that direction. Click the In the upper-right corner of the Scene View is the Scene Gizmo. This displays the Scene View Camera’s current orientation, and allows you to quickly modify the viewing angle.
middle of the Scene Gizmo, or the text below it, to toggle between Isometric Mode and Perspective Mode.

Notice how lines are drawn parallel to each other when using an isometric projection, while when using a perspective projection, lines converge towards one (or more) vanishing points.
You can also always shift-click the middle of the Scene Gizmo to get a “nice” perspective view with an angle that is looking at the scene from the side and slightly from above.
Note that in 2D mode, the scene gizmo will not be displayed since the only option is to have the view looking perpendicularly at the XY plane.
Navigation with the hand tool
Action
|
3-button mouse
|
2-button mouse or track-pad
|
Mac with only one mouse button or track-pad
|
Move
|
Hold Alt and middle click-drag.
|
Hold Alt-Control and click-drag.
|
Hold Alt-Command and click-drag.
|
*Orbit
|
Hold Alt and click-drag.
|
Hold Alt and click-drag.
|
Hold Alt and click-drag.
|
Zoom
|
Hold Alt and right click-drag or use scroll-wheel.
|
Hold Alt and right click-drag.
|
Hold Alt-Control and click-drag or use two-finger swipe.
|
* Not available in 2D mode.
GameObject & Component
Key concepts of Unity are GameObjects and Components.
GameObject is the core class of the framework and whose behaviour and properties are defined by means of components. A gameobject is situated into the scene and can be in an active or disabled state (meaning that the object will be or not be processed by Unity).
The basic and unremovable component of a gameobject is the Transform component, which defines position, rotation and size of the asset using a three coordinates system.
Other standard and important components are the Camera, Mesh Renderer, Collider, Animation and so on.
Even scripts are components and can be accessed by referring it’s type and gameobject.
Components, like gameobject, can be enabled and disabled at run time.
In our abstraction then, GameObjects are like agents, situated into an environment (scene), while components are used to differentiate in the most modular way possible different program domains (Unity implements with this the component pattern).
Execution order of event functions (simplified)

Design
Can we identify a good abstraction that can help up to visualize and design the complex entities of a videogame?
There’s seems to be some conceptual analogies with multi agent systems:
- system behaviour is highly decentralized
- each entity encapsulate his own thread of control
- there’s a notion of environment in which entities are situated
Agent abstraciton
Weak notion of an agent
An agent is an entity that encapsulate his thread of control, it’s situated into an environment of which he can perceive changes and thus react accordingly, changing the state of the environment himself. An agent drives it’s own behaviour and communicate with other agents by message passing.
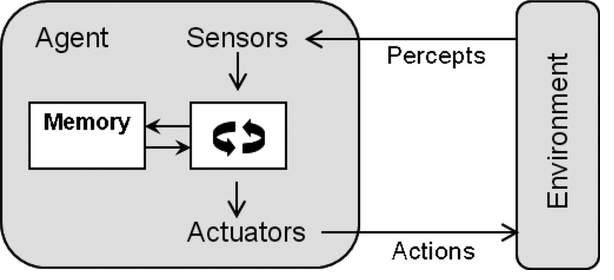
We can then imagine each meaningful GameObject in our game as an agent, that acts of it’s own adding some sort of functionality (Eg. it can control a GUI, an enemy, the player, etc). A GameObject is situated into the scene (our environment) and by using specific components it can perceive changes (like the pressure of a button) and act to change the state of the game.
Not every game object in our scene is an agent, it can be a tool with some functional capabilities for agents to use.
Tutorial 1: Roll a ball
In your first foray into Unity development, create a simple rolling ball game that teaches you many of the principles of working with Game Objects, Components, Prefabs, Physics and Scripting.
Design
Rough architecture
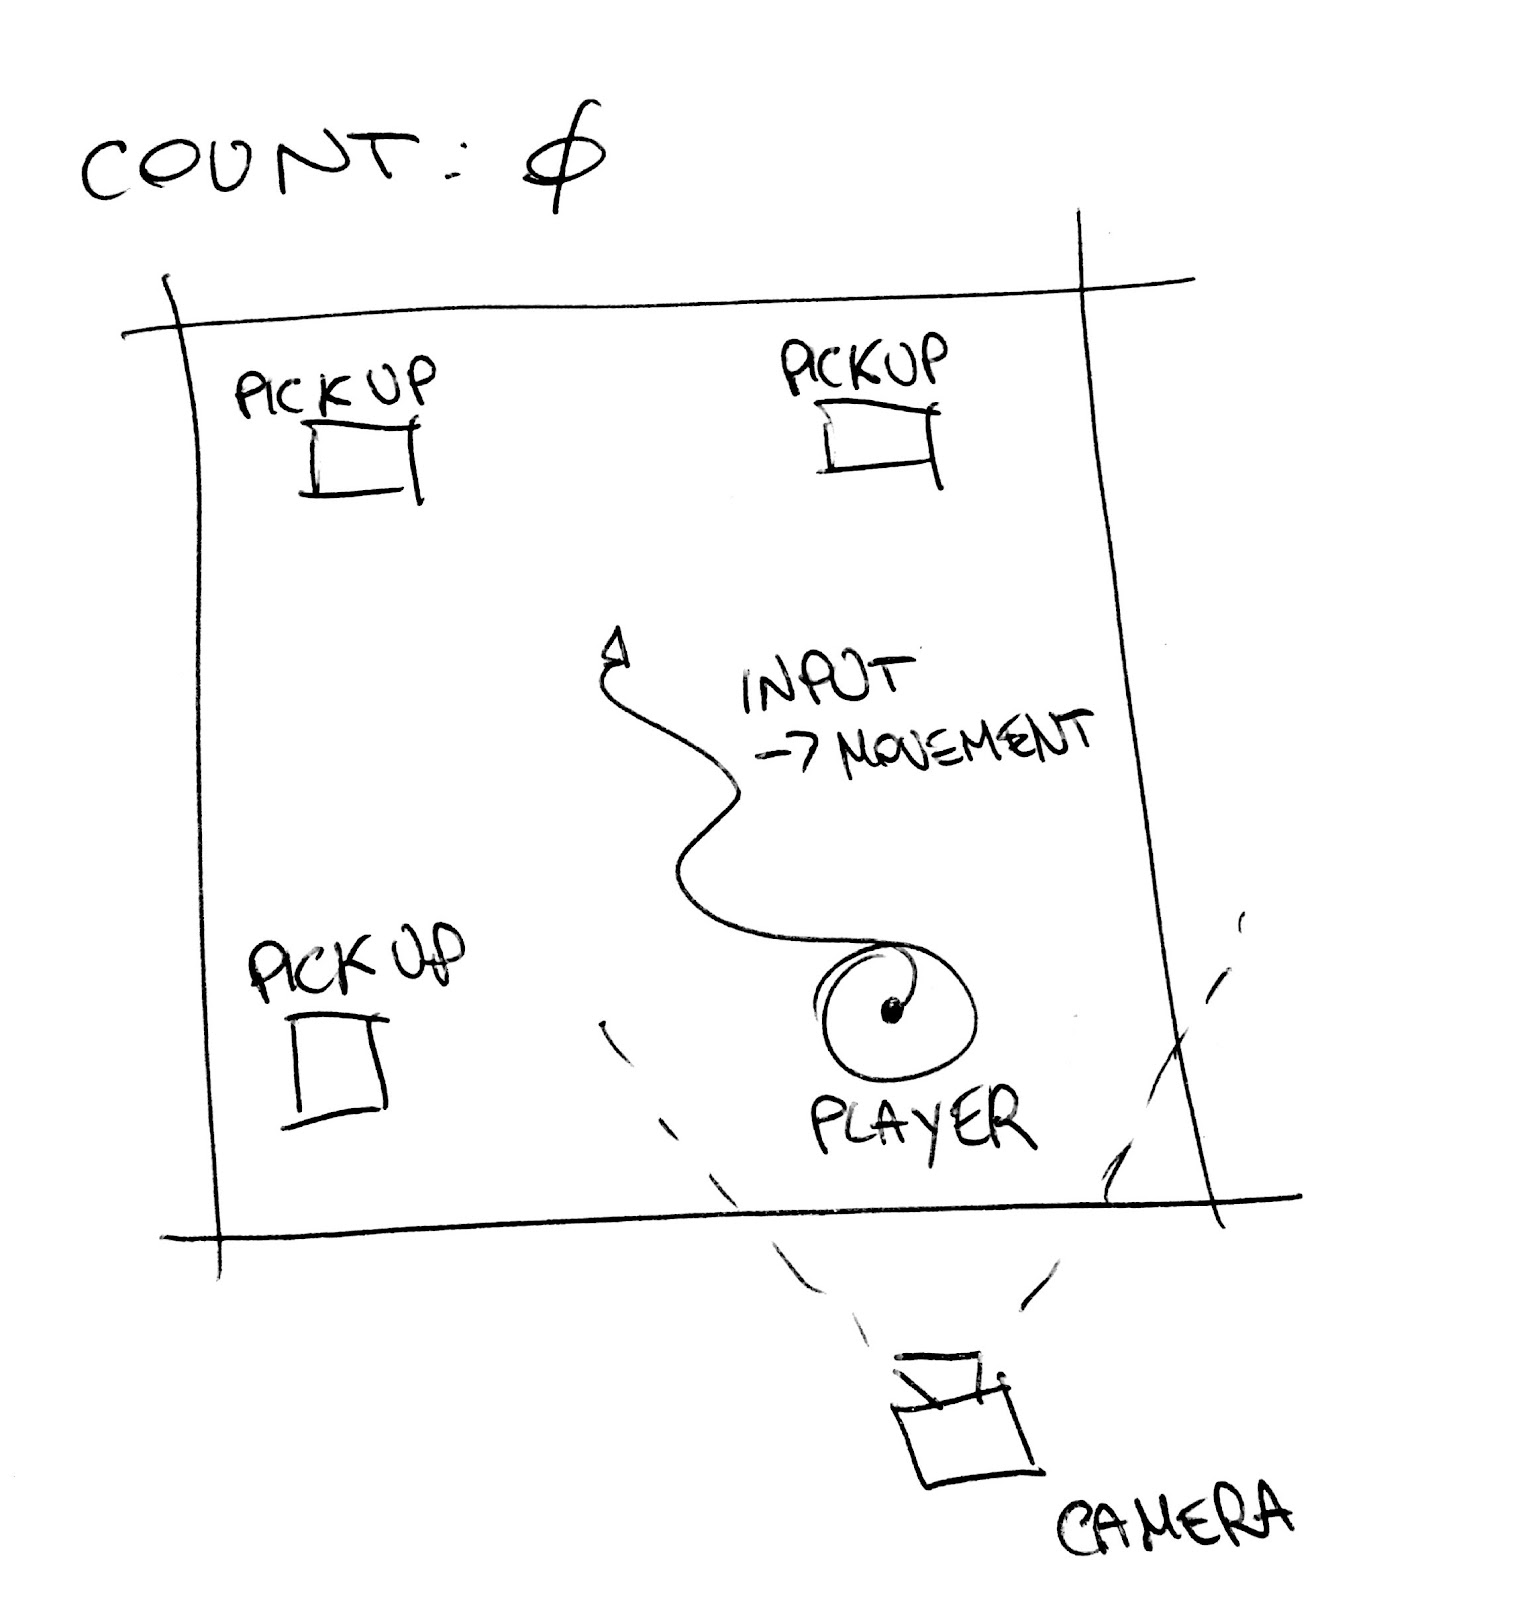
In a simple environment (like an open box) the player moves and collects pickable objects. The game ends when the player collects all the pickable. A counter shows on screen how many objects have been collected so far.
Agent abstraction
Player
The player is situated in the scene and has to collect the pickable.
- It perceives the input from the device and moves accordingly
- Perceives collisions with the pickable objects
Camera
The camera has to follow the player around when it moves.
- perceives player position in the scene and moves accordingly
Counter
Purely passive, updates the UI on screen and counts the picked up objects.
Let’s do this!
Setting up the game
Let’s start by setting up your scene.
- File > Save scene to save the scene into your project folder
- let’s call our first and only scene: main
- Setup the lights
- GameObject > Light > Directional Light
- setup at position (0,0,0) rotation (35,0,0)
- use Shadow Type to display shadows
- create another at position (0,0,0) rotation (-35,0,0)
- put everything into a parent gameobject called Lights
- Create the floor
- GameObject > 3d objects > Plane
- change name to Ground
- put it at position (0,0,0)
- size = (5,1,5)
- Create the walls
- GameObject > 3d objects > Cube
- resize it to (50,4,1)
- ctrl+d and duplicate
- rotate it and
- do it again
- put everything into a parent gameobject called Walls
- Create the player
- GameObject > 3d objects > Sphere
- make it size (2,2,2)
- add Component > Physics > Rigidbody
- Move the camera where you can see the player
Moving the player
After setting up the scene, let’s define the behaviour of our player.
As we already said, our player should:
- Perceive the input of our device.
- Move in the environment accordingly.
- Collect objects in the scene
For now let’s focus on the first two things, first thing to do is to create a script that will define the behaviour of our single player.
- Right click into the project window and select Create > new C# script
- Call the new script PlayerController
- Assign the script to our Player like it is a component
- or by simply dragging it onto it
- Open the script in MonoDevelop (double click it).
- Follow the code to define the player behaviour
using UnityEngine;
using System.Collections;
public class PlayerController : MonoBehaviour {
//Can be seen in the inspector
public float speed = 2.0f;
void Start(){
//called when loaded into the scene
//not needed
}
void Update(){
//Called before every single frame is rendered
//not needed
}
void FixedUpdate(){
//Called before physics math is done
//Get the user input
float moveHorizontal = Input.GetAxis ("Horizontal");
float moveVertical = Input.GetAxis ("Vertical");
Vector3 movement = new Vector3 (moveHorizontal * speed, 0, moveVertical * speed);
//Add the force to the rigidbody of the gameobject
GetComponent<Rigidbody>().AddForce (movement);
}
}
Tip: You can use Ctrl+’ to open the documentation on a specific method/component.
We can change and assign any public variable of our script at design time, for example we would like to test the game and check what’s the best speed for our player (relative to the input). Since the parameter is a float, we can also easily change it during run time.
Unity implements the command pattern by default, giving you the flexibility of changing the input configuration easily at both design and running time. To change or add new inputs, just select Edit > Project Settings > input .
About rigidbodies…
- be aware of the scale
“A common problem when starting out with Rigidbodies is that the game physics appears to run in "slow motion". This is actually due to the scale used for your models. The default gravity settings assume that one world unit corresponds to one metre of distance. With non-physical games, it doesn't make much difference if your models are all 100 units long but when using physics, they will be treated as very large objects. If a large scale is used for objects that are supposed to be small, they will appear to fall very slowly - the physics engine thinks they are very large objects falling over very large distances. With this in mind, be sure to keep your objects more or less at their scale in real life (so a car should be about 4 units = 4 metres, for example).”
- always use FixedUpdate() function to wrap physics call
In a script, the FixedUpdate function is recommended as the place to apply forces and change Rigidbody settings (as opposed to Update, which is used for most other frame update tasks). The reason for this is that physics updates are carried out in measured time steps that don't coincide with the frame update. FixedUpdate is called immediately before each physics update and so any changes made there will be processed directly.
Moving the camera
The camera is still static, we want the camera to follow the player having always a fixed position relative to the player.
Again let’s create a new C# script and name it CameraController
public class CameraController : MonoBehaviour {
public GameObject Player;
private Vector3 offset;
// Use this for initialization
void Start () {
offset = transform.position;
}
// Sweets better than Update()
void LateUpdate () {
transform.position = offset + Player.transform.position;
}
}
Align the camera so that it can see the player, assign the script to the Main Camera and test the game.
Creating pick-up objects
We are now going to define a sample object that our player will collect when the two collide.
- Create a cube (GameObject > 3d objects > Cube)
- Make it size (1,1,1)
- Rotate it a little by giving it rotation (25,25,0)
- Add a Box Collider component
- check is Trigger box
- Add a new Rigidbody component
- check is Kinematic flag
- Create a new tag for the pickup object
- select the Tag window at the top of the inspector
- Add new tag...
- let’s call it PickUp

We want our object to be identifiable to the player, so let’s make a simple script that just make the cube spin on itself.
Create a new C# script and call it Rotator, then assign it to the pickup object.
public class Rotator : MonoBehaviour {
void Update () {
//Action is frame independent thanks to deltaTime
transform.Rotate (new Vector3 (15, 30, 45) * Time.deltaTime);
}
}
We have now created our “sample” for the pickup object, we don’t want to just copy and paste it, we want to store it in a more flexible way in relation to future changes to the object. We will then use a prefab.
- Create a new empty prefab
- right click into the project view, create new > prefab
- call it PickUp
- Drag our object into the just created prefab
- We have now a sample wi can spam around our scene at will
Test the game, the player will now just go trough the objects, why?
- It’s because the collider flag isTrigger is set to true
- Triggers are special kind of colliders that are used we are only interested to the collision event.
Why isKinematic (related to the ridigbody)?
- If isKinematic is enabled, Forces, collisions or joints will not affect the rigidbody anymore. The rigidbody will be under full control of animation or script control by changing transform.position.
- Kinematic rigidbodies are also particularly useful for making characters which are normally driven by an animation, but on certain events can be quickly turned into a ragdoll by setting isKinematic to false.
If I just need to perform a transform, using a rigidbody seems pointless…
- It’s useful because it’s a performance trick.
- By sticking a rigidbody to an object you tell the engine that it is dynamic
- static objects (position, orientation, etc) are stored in cache, when you move them Unity have to update it too.
- we loose a bit of computation multiplied by a large number of object.
Collecting
Now let’s focus on the ability of the player of picking up the already defined pickup objects, we also want to count how many items we’ve already collected for later use.
For starter, we have to modify the PlayerController script, we want our player to be able to perceive when he collides with a pickup object. We are gonna use the OnTriggerEnter function to do something in reaction to a collision and the already defined PickUp tag to identify the collider of our interest.
void OnTriggerEnter(Collider other){
if(other.gameObject.tag == "PickUp"){
other.gameObject.SetActive (false); //deactivate it.
//Destroy (other.gameObject); //destroy the object and his childrens
}
Debug.Log ("Triggered by an object with tag: " + other.gameObject.tag);
//What's the difference? I can reactivate it during editor runtime.
}
Counting and displaying text
Before writing our code, we have to create our on screen User Interface. There are many ways of doing this, let’s use the new Unity 4 UI system.
- GameObject > UI > Text
- Call the created Text CounterText
- Switch to 2d mode and position the text in the upper left part of the screen
- use the rect transform tool
- press on the square under Rect Transform
- hold Alt and click left + top
- Change the text dimension, color, text…
- Do the same thing for a new Text called WinnerText
- position in on the center
- initially disable the Text (Script)

Counting, displaying and updating the GUI are things that our player shouldn’t we worrying about. To mantain things more clear we now create a new script called CountController, assigned to an empty gameobject called ControlCenter.
using UnityEngine;
using UnityEngine.UI; //for the new UI system
using System.Collections;
public class CountController : MonoBehaviour {
//References
public Text counterText;
public Text winnerText;
int pickUpNumber;
int count = 0;
// Use this for initialization
void Start () {
//Wanna get the number of pickups from the scene
pickUpNumber = GameObject.FindGameObjectsWithTag ("PickUp").Length;
}
void SetCounter(int value){
count = value;
counterText.text = "Collected: " + count;
if (count >= pickUpNumber)
winnerText.enabled = true;
}
public void IncCounter(){
SetCounter (++count);
}
}
Assign the Text component to the script and update the PlayerController script to call IncCounter() when the player pick up an object.
//references
private GameObject controlCenter;
void Start(){
//Let's find the control center
controlCenter = GameObject.Find ("ControlCenter");
}
void OnTriggerEnter(Collider other){
if(other.gameObject.tag == "PickUp"){
other.gameObject.SetActive (false); //deactivate it.
//increment the counter
controlCenter.GetComponent<CountController>().IncCounter();
//there are other ways of doing this, static, SendMessage, etc
}
}
Test the game and have fun!
Publishing the game
Unity is platform independent and permits to build for almost any console of new generation.
- File > Build Settings...
- Add your scene to the build
- Build the game for the selected platform in any directory
- you can create a build subfolder for simplicity
- Test the game again just to be sure everythings works
Bibliography
- Unity3D e Spline: sviluppo di un videogame basato sulle curve spline - Pierluigi Montagna
Nessun commento:
Posta un commento