Me and other guys from S.P.R.I.Te., with the help of professors from Unibo had the chance of working on Game as a Lab, a project made by students for students to teach game programming patterns and principles. I had the chance to make my some lectures about Unity3d, in this and the next blog posts I'm gonna share materials of the course, hoping to help some passenger.

Index
- Download the package
- Design of the game
- Rough architecture
- Agent abstraction
- Tutorial2: Survival Shooter
- Environment Setup
- Player Character
- Camera Setup
- Creating Enemy #1
- Health HUD
- Player Health
- Harming Enemies
- Scoring Points
- Spawning Enemies
- Game Over
- Extensions
- Behaviour State Automata
- Steering Behaviours
- Leader Following
- Following
- Separation
- Avoidance
- Avoiding Player Shooting
- Stochastic Behaviour
- Searching for the leader
Download
This tutorial follows what has been done during Unite training day 20014.
For starter download the assets at the following link: https://www.assetstore.unity3d.com/en/#!/content/21028
Also, you can follow the Unite2014 at the webpage:
http://unity3d.com/learn/tutorials/projects/survival-shooter
http://unity3d.com/learn/tutorials/projects/survival-shooter
Unzip ‘All Unite Training Day Projects’
- Open Unity, File > Open Project
- Open ‘Unite 2014 Training Day’
Design of the game
We want to create an isometric shooter game called “Nightmares”. The player is a kid in his dream that have to defend with his infinite shooting rifle from zombie puppets.
Rough Architecture

Agent Abstraction
Who are the main agents and items of our game and how are we gonna define their behaviour?
Player
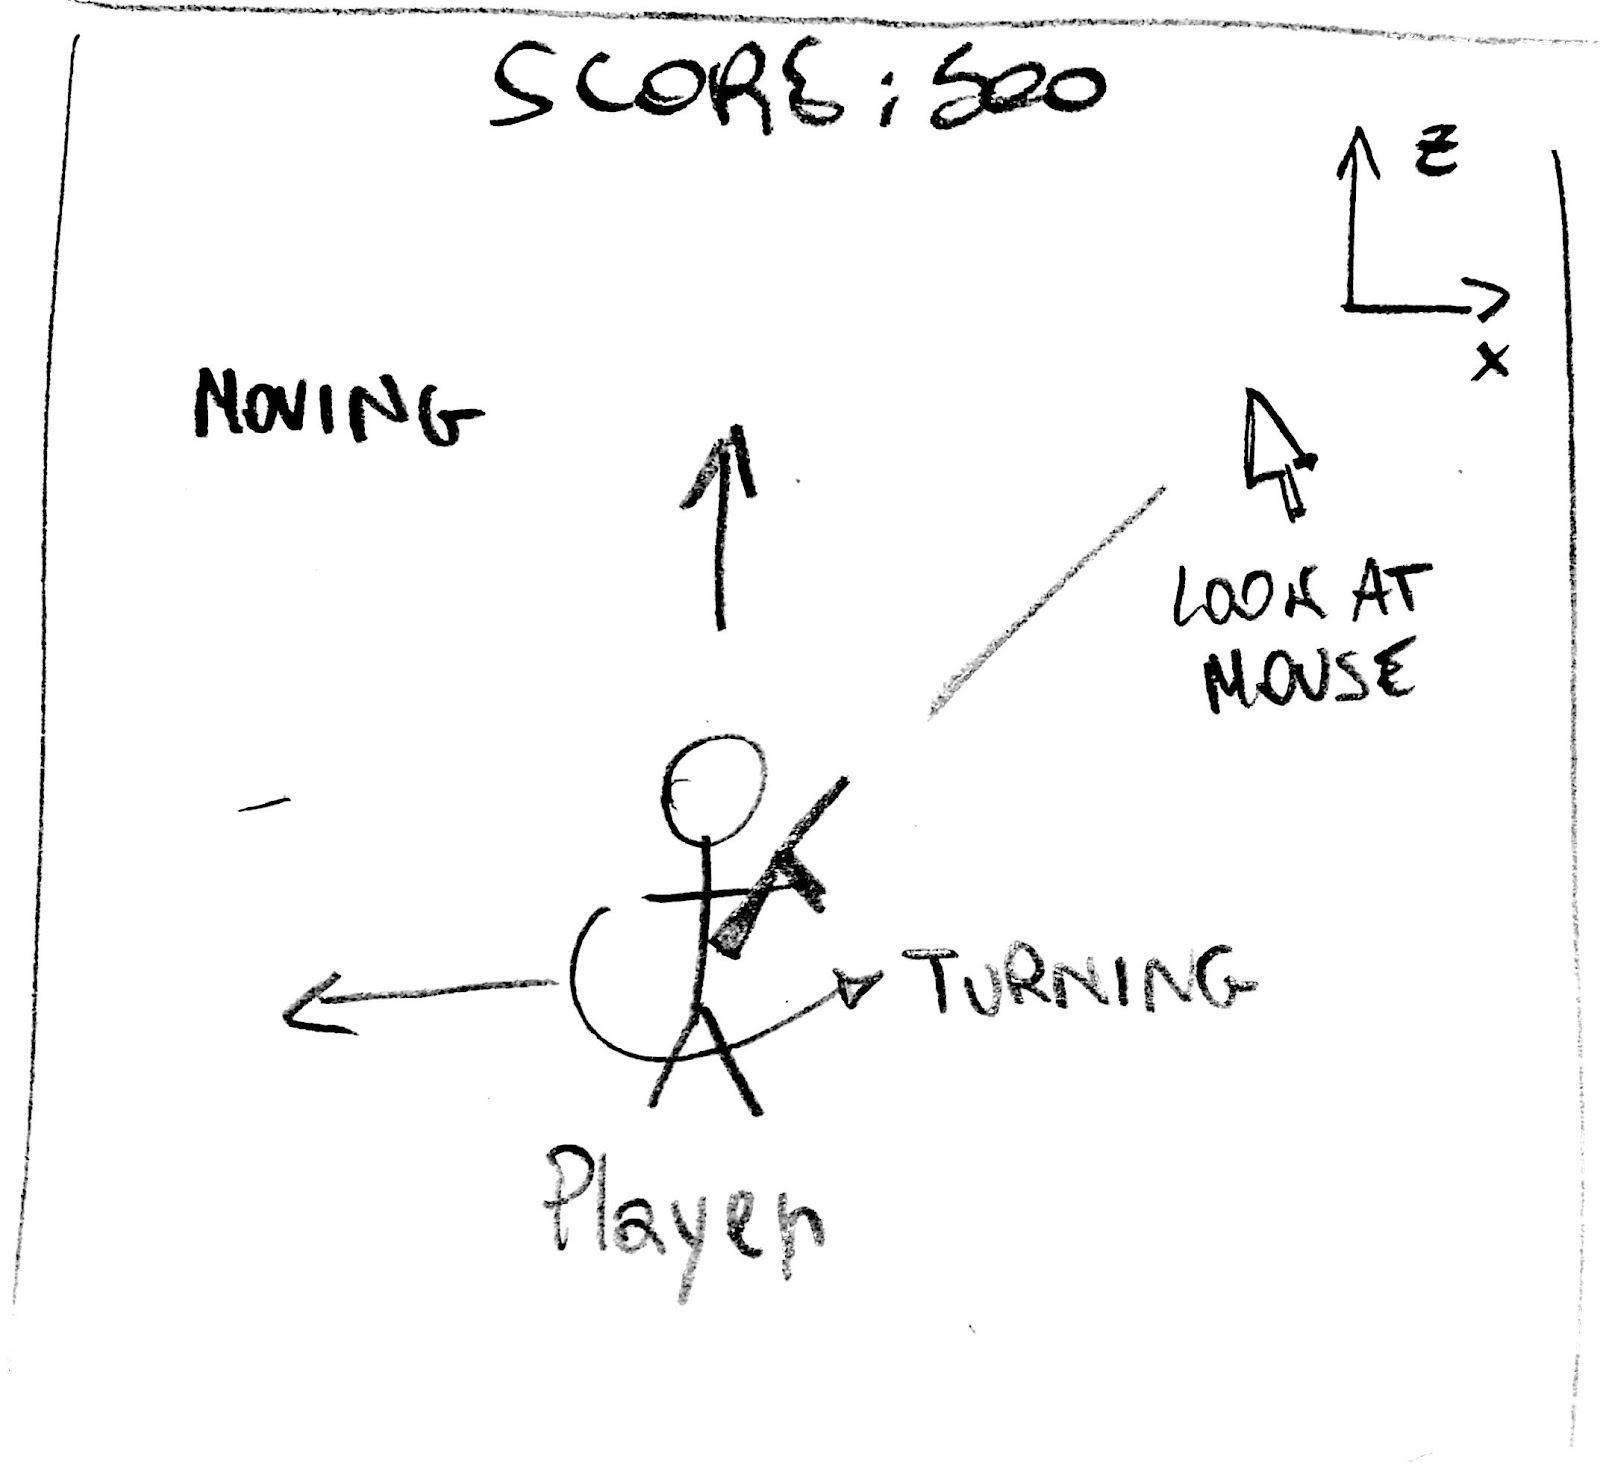
The player needs to move into the scene and fights enemy. It has his own health and dies when it reaches zero. We can distinguish the modules for the player behaviour:
- Movement: The player needs to perceive the input from the keyboard and mouse to move and turn around into the scene.
- Health: The player needs to know his health and die when it reaches zero.
- Shooting: The player shoots with his rifle in the direction he’s facing, when he perceives the user input.
Camera
The camera follows the player around into the scene.
- It perceives the player position and moves smoothly to follow him.
Enemy
The enemy needs to seek the player into the scene and attack him at short distance. The enemy will be fully autonomous and can potentially show a complex behaviour. His basic functionality are:
- Perceiving the player into the scene and attacking him.
- Moving into the scene.
- Decreasing his health when it’s hit by the player bullets and die when it reaches zero.
Score Counter
It’s a pure passive component that has to count the user score to display on screen.
Tutorial2: Survival Shooter (Implementation)
Environment Setup
1. Setup Editor Layout 2 by 3
2. Drag Project tab below the Hierarchy
3. Set view slider to minimum on Project panel
4. File > New Scene
5. File > Save Scene As, name it Level 01 in Scenes folder
1. Locate Environment prefab in the Project panel Prefabs folder
2. Drag into Scene or Hierarchy
3. Ensure it is at Position (0, 0, 0) in Transform
4. Repeat 1-3 for the Lights prefab
5. Save your Scene (CMD-S / CTRL-S)
1. GameObject menu > 3D Object > Quad
2. Rename to Floor (Return / F2)
3. Ensure it is at Position (0, 0, 0) in Transform
4. Set Rotation (90, 0, 0) in Transform
5. Set Scale to (100, 100, 1) in Transform
1. Remove Mesh Renderer Component from the Floor game object
- This will leave only the collider
2. Set the Floor game object to use the Floor layer at the top of the Inspector panel
- this will later be used to identify the floor in our script
3. Save your Scene (CMD-S / CTRL/S)
>Optional for bg music
1. GameObject > Create Empty
2. Rename GameObject to BackgroundMusic
3. Add Component > Audio > Audio Source
4. Audio Clip > Circle Select > Background Music
5. Check Loop and set Volume to 0.1
6. Save your Scene (CMD-S / CTRL/S)
Player Character
1. Locate the Player model in Models > Characters folder of the Project panel
2. Drag it into the Scene or Hierarchy panels
3. Set the Position to (0, 0, 0) in Transform
4. Set the Tag to Player in the drop-down in Inspector
Animation (FSM)
1. Select the Animation folder and click Create on the Project panel, choose Animator Controller
2. Name this new asset PlayerAC
3. Drag and drop it onto the Player in the Hierarchy
4. Double-click PlayerAC asset in Project > Animation
5. Dock the Animator window by the Scene view
1. Expand the Player model in Models > Characters
2. Drag the Idle, Move and Death animations to empty space in the Animator window to create states
3. Right-click Idle state and choose Set as Default
4. Create a bool parameter named IsWalking
5. Create a Trigger parameter named Die
1. Right-click Idle and Make Transition to Move
2. Select the Transition arrow you made
3. Set the Condition for this to IsWalking = true
4. Right-click Move and Make Transition to Idle
5. Set the Condition for this to IsWalking = false
6. Right-click ‘Any State’ and Make Transition to Death
7. Set the Condition for this to Die (trigger)

1. Select Player game object, Add Component > Physics > Rigidbody
2. Set Drag & Angular Drag to Infinity
- cheap trick to stop some not needed forces generated by the physic engine
3. Expand the Constraints, Freeze the Y Position, and Freeze the X and Z Rotations
1. Select Player game object, Add Component >
Physics > Capsule Collider
2. Set Center to (0.2, 0.6, 0)
3. Set Height to 1.2
1. Add Component > Audio > Audio Source
2. Audio Clip > Circle Select Player Hurt
3. Uncheck Play On Awake
4. Locate PlayerMovement script in Scripts > Player
5. Drag & Drop this to Player game object in Hierarchy
6. Save your Scene (CMD-S / CTRL/S)
7. Open the PlayerMovement script
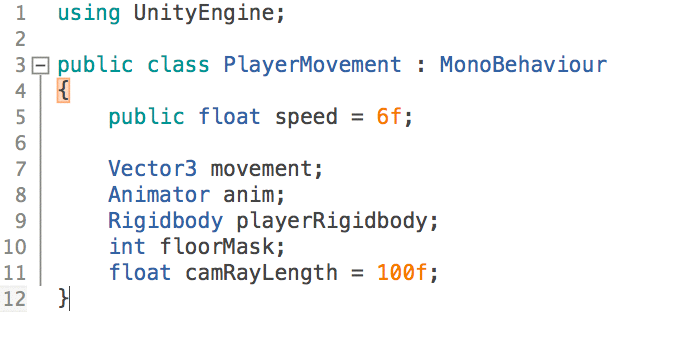
Add needed variables to the script, public variables are visible in the inspector.

Initialize the variable within Monobehaviour.Awake() function.
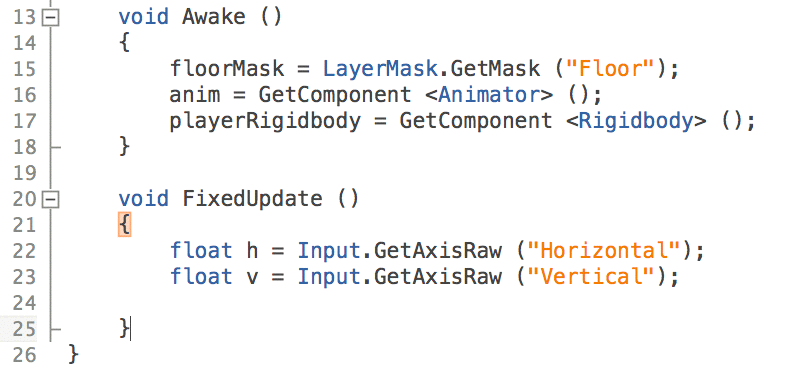
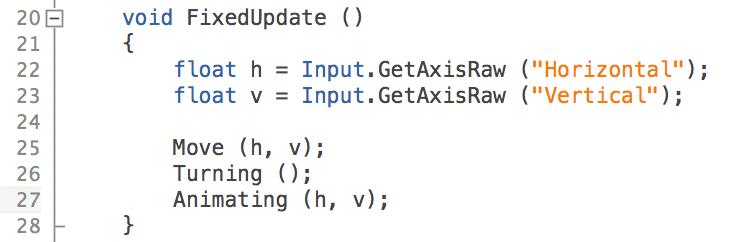
First thing we add to our FixedUpdate() function is the perception of the input.
Then we proceed to write the Move() function that exploits the player rigidbody to make it move into the scene. It’s important to fixate the movement in time, using Time.deltatime.

Since the sum of the two movement vector can be greater than 1 and we don’t want our player to move faster diagonally we have to normalize it afterward.
We’ll now focus on the turning function that rotates the player to face the point the mouse is currently hold on screen.

We can perceive the point where our mouse pointer is currently on into the scene by drawing a ray that from the camera is directed to the mouse position, then using a raycast we can find the point from the intersection of the ray and the Floor layer.

Let’s write the animation function.
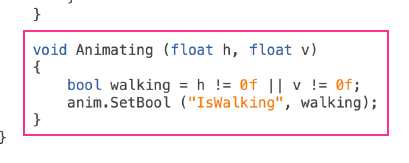
Test your game.
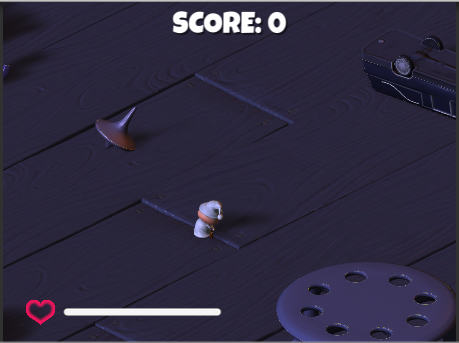
Camera Setup
1. Select the Main Camera in Hierarchy
2. Set the Transform Position to (1, 15, -22)
3. Set the Transform Rotation to (30, 0, 0)
4. In the Camera component set the Projection to Orthographic mode
5. Set the Size value to 4.5
1. Set Background Color to Black
2. Save your Scene (CMD-S / CTRL/S)
3. Select the Camera folder in the Scripts folder of the Project panel
4. Click Create > C# Script on Project panel
5. Name the script CameraFollow
1. Drag and drop the CameraFollow script onto the Main Camera in Hierarchy
2. Save your scene now!
3. Click Open at the top of the Inspector or double-click the script’s icon to open it for editing
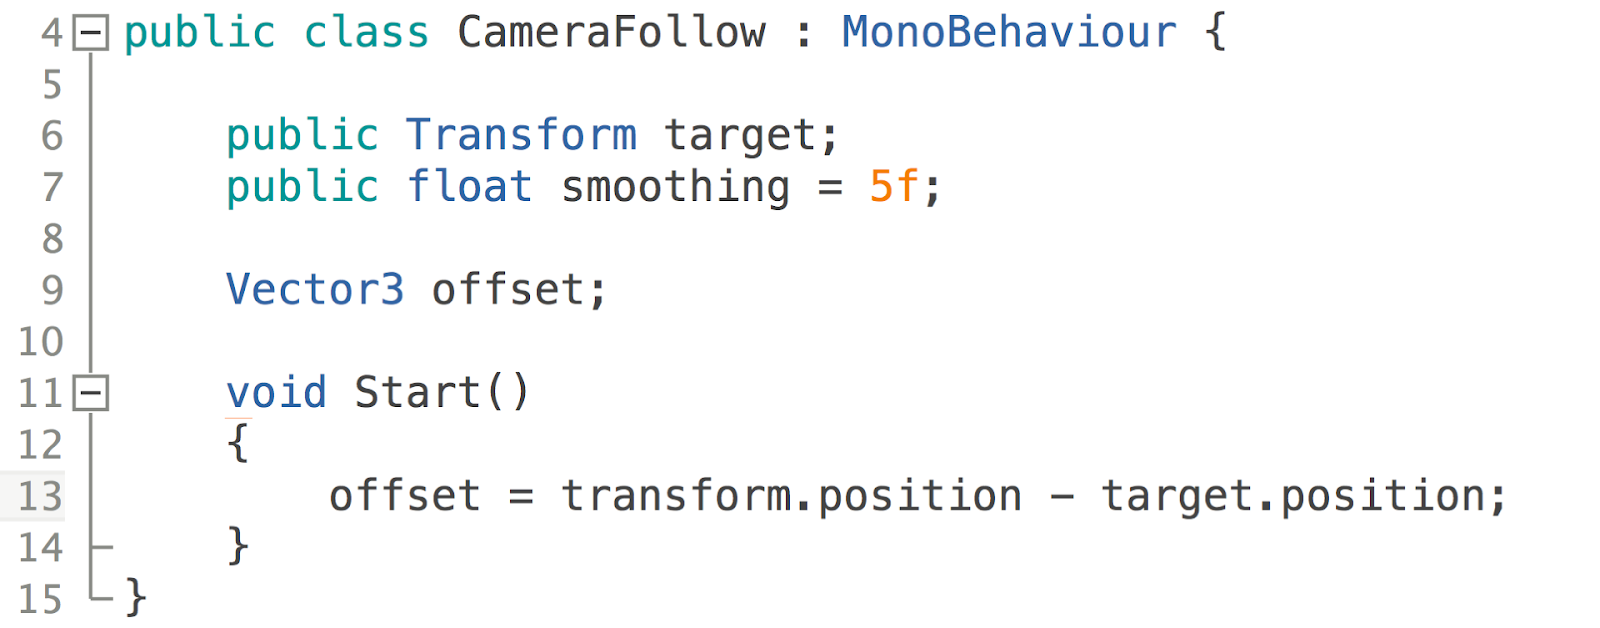
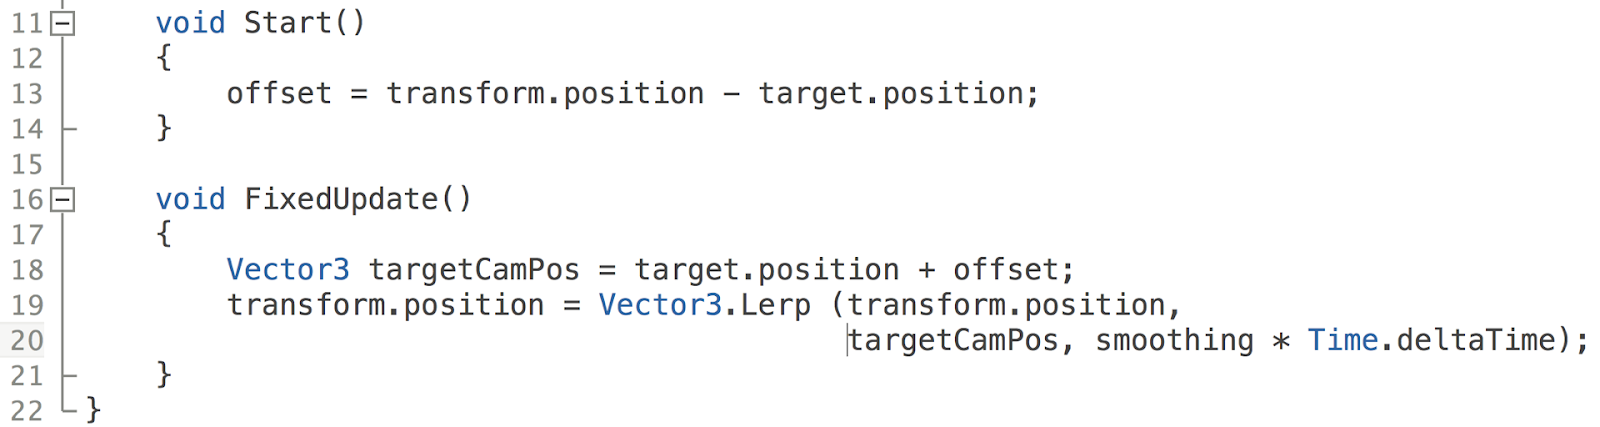
Let’s start by defining our variables. We want our camera to smoothly follow the player by having a distance given by an offset vector. We get the distance from the difference that holds between the target and the camera at design time.
We use Vector3.Lerp function to smoothly move the camera.
1. Save your Script, and return to Unity
2. Select the MainCamera and assign Player from the Hierarchy to the Target variable on CameraFollow
3. Save your Player as a Prefab by dragging the Player game object from Hierarchy to the Prefabs folder in the Project. Save, and press Play to test!
Creating Enemy #1
1. Locate the Zombunny model in the Models > Characters folder in the Project
2. Drag and Drop the model into the Scene
3. Find HitParticles in the Prefabs folder, drag and drop this onto the Zombunny in the Hierarchy
4. Choose the Shootable layer for this game object
Ridigbody
1. Add Component > Physics > Rigidbody
2. Set Drag & Angular Drag to Infinity
3. In Constraints Freeze Position Y and Freeze Rotation X and Z
4. Add Component > Physics > Capsule Collider
5. Set Center Y to 0.8 and Height to 1.5
Collider
1. Add Component > Physics > Sphere Collider
2. Check the Is Trigger box
3. Set Center Y and Radius both to 0.8
4. Add Component > Audio > Audio Source
5. Circle select the Zombunny Hurt audio clip
6. Uncheck the Play On Awake box
Navigation Mesh and Pathfinding
1. Add Component > Navigation > Nav Mesh Agent
2. Set Radius to 0.3
3. Set Speed to 3
4. Set Stopping Distance to 1.3
5. Set Height to 1.1
1. Go to Window > Navigation and dock it
2. Choose the Bake tab at the top
3. Set Radius to 0.75
4. Set Height to 1.2 and Step Height to 0.1
5. In Advanced area, set Width Inaccuracy % to 1
6. Click Bake at the bottom to bake the Nav Mesh
Enemy Animation
1. Select the Animation folder in Project panel
2. Right-click it and Create > Animator Controller
3. Name the asset EnemyAC (for Animator Controller)
4. Drag and Drop this asset onto the Zombunny parent object in the Hierarchy
5. Double-click EnemyAC to open in Animator window
1. Locate and expand the Zombunny model in the Models > Characters folder in Project panel
2. There are 3 animations - Idle, Move and Death set up
3. Drag each clip to Animator, starting with Move
4. Position Idle and Move states near one another, and place Death near to the Any State
1. Ensure that Move state is default (orange highlight)
2. If not, right-click and choose Set as Default
3. In the Animator window’s Parameters, click + and make a Trigger parameter named PlayerDead
4. Make another Trigger parameter named Dead
1. Right-click the Move state and create a transition to the Idle state
2. Right click the Any State and create a transition to the Death state
3. Set the Condition for Move -> Idle to PlayerDead
4. Set the Condition for Any State -> Death to Dead
Enemy behaviour
1. In Scripts > Enemy folder in the Project, locate EnemyMovement script, drag-drop onto Zombunny
2. Save your Scene
3. Double-click the script icon to open for editing
4. Press Play to test the game
Take some time to inspect the script.
- How the enemy moves?
Health HUD
1. Click the 2D mode button on the Scene view
2. Choose GameObject > UI > Canvas from menu
3. Rename your Canvas to HUDCanvas
4. Add Component > Miscellaneous > Canvas Group
5. Un-check Interactable and Blocks Raycasts checkboxes
1. Right-click HUDCanvas > Create Empty to add child
2. Rename GameObject to HealthUI
3. In the Rect Transform, click the Anchor Presets button, and set HealthUI’s Anchor, Position and Pivot to bottom left using Alt-Shift-click on anchor preset
4. In Rect Transform, set Width to 75 and Height to 60
1. Right-click HealthUI > UI > Image to add child
2. Rename Image to Heart
3. In Rect Transform set Position X and Y to 0
4. Set Width and Height to 30
5. In the Image component, for Source Image, circle select the Heart sprite from Assets
1. Right-click HealthUI > UI > Slider
2. Rename Slider to HealthSlider
3. In Rect Transform, set Position X to 95, Y to 0
4. Expand the HealthSlider to show children, select the Handle Slide Area child of the HealthSlider and delete it from the Hierarchy (Command-Backspace, Delete)
1. In the Slider component of HealthSlider, set the Transition mode to None
2. Set the Max Value property to 100
3. Also set the actual Value to 100 for full health
1. Right-click HUDCanvas and create a UI > Image
2. Rename to DamageImage and set Rect Transform Anchor preset to Stretch in both dimensions by Alt + clicking the lower right preset
3. In the Image component, click the Colour block and set the Alpha (A) value to 0
Player Health
1. In the Scripts > Player folder, locate PlayerHealth
2. Drag & drop this onto the Player in the Hierarchy
3. Open the PlayerHealth script to examine it!
4. Now let’s return to the Unity Editor..
1. In the PlayerHealth (Script) component, assign HealthSlider from the Hierarchy to the Health Slider public variable slot using drag and drop
2. On the same component, assign DamageImage from the Hierarchy to the Damage Image public variable slot via drag & drop
1. On the PlayerHealth (Script) component, assign the Player Death audio clip to the Death Clip using circle select
2. Locate EnemyAttack in the Scripts > Enemy folder of the Project, and drag & drop this onto the Zombunny in the Hierarchy
1. Open the EnemyAttack script for editing by double-clicking the script icon in the Project
We use the OnTriggerEnter / Exit to know when the player is in range.
void OnTriggerEnter (Collider other)
{
if(other.gameObject == player)
{
playerInRange = true;
}
}
void OnTriggerExit (Collider other)
{
if(other.gameObject == player)
{
playerInRange = false;
}
}
We then use a timer in the Update() function to attack the player with a timed basis.
void Update ()
{
timer += Time.deltaTime;
if(timer >= timeBetweenAttacks && playerInRange)
{
Attack ();
timer = 0f;
}
if(playerHealth.currentHealth <= 0)
{
anim.SetTrigger ("PlayerDead");
}
}
void Attack ()
{
if(playerHealth.currentHealth > 0)
{
playerHealth.TakeDamage (attackDamage);
}
}
2. When done, return to the Unity Editor
3. Save your scene
Harming Enemies
1. In the Scripts > Enemy folder, locate EnemyHealth
2. Drag & drop this onto the Zombunny in the Hierarchy
3. In the Enemy Health (Script) component, assign Zombunny death clip to the Death Clip variable
4. Open the EnemyHealth script for viewing
5. Save your script and return to the Unity Editor
1. Re-open the EnemyAttack script by double-clicking the icon of the script component in the Inspector
2. Un-comment lines 13 and 22 by removing the preceding // symbols in front of each line
3. Un-comment part of line 49 that is also commented out, Save your script & return
1. In the Project > Prefabs folder, select GunParticles
2. Click the Cog icon to the right of Particle System and choose Copy Component from the context-menu
3. Expand the Player game object in the Hierarchy and select the child object GunBarrelEnd
4. Click any Cog and choose Paste Component as New
1. Collapse the new Particle System component
2. With GunBarrelEnd still selected, Add Component > Effects > Line Renderer
3. Expand Materials area and use circle select to pick the element, choose LineRenderMaterial
1. Expand Parameters section of Line Renderer, set the Line Renderer’s Start Width and End Width to 0.05
2. Disable Line Renderer component via the checkbox
1. Add Component > Rendering > Light
2. Choose a Yellow colour from the Color block / Picker
3. Disable the Light component using the checkbox
4. Add Component > Audio > Audio Source
5. Set the Audio clip to Player Gunshot via circle select
6. Uncheck Play On Awake for this audio source
1. In Project > Scripts > Player folder, assign PlayerShooting to GunBarrelEnd in Hierarchy
2. Open the PlayerShooting script for viewing
3. Close the script and return to the Unity Editor
4. Select Player in the Hierarchy and click Apply at the top of the Inspector to update our Prefab
1. Save your Scene
2. Press Play to test your scene
3. Uh-oh! An Error! In the Scripts > Enemy folder of the Project, double-click EnemyMovement to open it
4. Remove all // symbols to un-comment the inactive lines of code in the script, Save your script!
1. In the Scripts > Player folder of the Project, doubleclick PlayerHealth to open it
2. Remove all // symbols to un-comment the inactive lines of code in the script, and Save the script
3. Return to the Unity editor
4. Save your Scene, and press Play to test
Scoring Points
1. Select the HUDCanvas in the Hierarchy and right-click to create UI > Text as a child game object
2. Rename this Text game object ScoreText
3. Set the Anchor position in the Rect Transform to the Top Center preset
4. Set Position X to 0 and Position Y to -55
1. Change Width to 300 and Height to 50
2. In the Text component, set the Text to “Score: 0”
3. For the Font, circle-select the Luckiest Guy typeface
4. Set the Font size to 50
5. Set Alignments to Center and Middle
6. Set the font Color to White by clicking the color block
1. Add Component > type ‘Shadow’ to add the Shadow component, set the Effect Distance values to (2, -2)
2. In the Scripts > Managers folder, locate the ScoreManager script, drag and drop this onto the ScoreText game object
3. Open the script for review, then return to Unity
1. Select the Zombunny in the Hierarchy and locate the EnemyHealth (script) component, double-click it’s icon to open for editing
2. Remove the // symbols to un-comment line 77 in the StartSinking() function
3. Save the script and return to the Unity editor
1. Press Play to test your Scene
2. Drag the Zombunny game object to the Prefabs folder in the Project panel to save it as a prefab
3. Remove the Zombunny game object from the Hierarchy using Delete (PC) or Cmd-Backspace (Mac)
4. Save your Scene
Spawning Enemies
1. In the Prefabs folder of the Project, select the Zombear - he’s just like our Zombunny
2. Expand Zombear’s Animator component
3. From the Project, drag and drop EnemyAC from the Animation folder onto the Animator controller property of Zombear’s Animator component
1. In the Prefabs folder of the Project, select the Hellephant
2. Select the Animation folder in the Project, and then click Create > Animator Override Controller
3. Name this asset HellephantAOC
4. Assign EnemyAC to the Controller property
1. In the Models > Characters folder of the Project, expand Hellephant model to see animation clips
2. Drag Idle, Move and Death onto the corresponding slots in the HellephantAOC Override table
3. Select Hellephant in the Prefabs folder and assign HellephantAOC to it’s Animator Controller
1. Go to GameObject > Create Empty, rename this from GameObject to EnemyManager
2. In the Scripts > Managers folder of the Project, locate the EnemyManager script, and drag it onto the EnemyManager game object
3. Open the EnemyManager script & switch back after
1. Go to GameObject > Create Empty, rename this from GameObject to ZombunnySpawnPoint
2. At the top of the Inspector, set the Gizmo for the ZombunnySpawnPoint object to the colour blue
3. Set Transform > Position to (-20.5, 0, 12.5)
4. Set Transform > Rotation to (0, 130, 0)
1. Go to GameObject > Create Empty, rename this from GameObject to ZombearSpawnPoint
2. At the top of the Inspector, set the Gizmo for the ZombearSpawnPoint object to the colour pink
3. Set Transform > Position to (22.5, 0, 15)
4. Set Transform > Rotation to (0, 240, 0)
1. Go to GameObject > Create Empty, rename this from GameObject to HellephantSpawnPoint
2. At the top of the Inspector, set the Gizmo for the HellephantSpawnPoint object to the colour yellow
3. Set Transform > Position to (0, 0, 32)
4. Set Transform > Rotation to (0, 230, 0)
1. Select EnemyManager in the Hierarchy, in the EnemyManager component, assign the Player game object to the PlayerHealth variable
2. From the Prefabs folder, drag Zombunny onto the Enemy property as the game object to spawn
3. Ensure that Spawn Time is set to 3 seconds
1. Drag the ZombunnySpawnPoint from the Hierarchy onto the title of the SpawnPoints array variable
2. Save your scene
3. Press Play to test the game
1. In the Scripts > Managers folder of the Project, locate the EnemyManager script, and drag it onto the EnemyManager game object 2 more times
2. Ensure there are now 3 EnemyManager spawner components on the EnemyManager game object
1. Assign the Player game object to the PlayerHealth variable on both new EnemyManager components
2. From the Prefabs folder, drag Zombear onto the Enemy property of the second EnemyManager
3. From the Prefabs folder, drag Hellephant onto the Enemy property of the third EnemyManager
1. Drag the ZombearSpawnPoint from the Hierarchy onto the title of the SpawnPoints array variable in the second EnemyManager
2. Drag the HellephantSpawnPoint from the Hierarchy onto the title of the SpawnPoints array variable in the third EnemyManager
1. In the third EnemyManager for the Hellephant, set the Spawn Time to 10
2. Save your scene
3. Press Play to test your scene
We now want to limit the number of enemies on screen, we’ll use a constant and have track of the current number of enemies into the scene.
- Change the EnemyManager script as follow:
static int spawnedEnemies = 0;
static int killedEnemies = 0;
void Start ()
{
parent = GameObject.Find ("Enemies").transform;
InvokeRepeating ("Spawn", spawnTime, spawnTime);
}
void Spawn ()
{
if(playerHealth.currentHealth <= 0f)
{
return;
}
//We'll limit the max number of entity on screen
if (GetEnemyOnScene() < MAX_ENEMIES_INSTANCE) {
int spawnPointIndex = Random.Range (0, spawnPoints.Length);
GameObject instantiated = (GameObject) Instantiate (enemy, spawnPoints [spawnPointIndex].position, spawnPoints [spawnPointIndex].rotation);
instantiated.transform.parent = parent; //we move the go in a parent, it's less of a mess
spawnedEnemies++;
}
}
public static void IncKilledEnemies(){
killedEnemies++;
}
public static int GetEnemyOnScene(){
return spawnedEnemies - killedEnemies;
}
2. Update the Death() function of EnemyHealth to increase the killedEnemies counter.
3. Test again.
Game Over
1. Right-click HUDCanvas and create a UI > Image
2. Rename this game object ScreenFader
3. In the Rect Transform component, click the Anchor Presets button and Alt-Click the Stretch both option
4. In the Image component, click the Color block and choose a shade of light blue
1. Right-click HUDCanvas and create a UI > Text
2. Rename this game object GameOverText
3. In the Rect Transform component, click the Anchor Presets button and Alt-Click the Middle center option
4. Set the Width to 300 and Height to 50
1. In the Text component, set the Text property to read ‘Game Over!’
2. Using circle select, set the Font to Luckiest Guy
3. Set Font Size to 50, Alignment to Middle and Center
4. Set the Color to white using the Color block picker
5. Add Component > type in Shadow and confirm
1. Re-order the children of HUDCanvas using drag and drop in the Hierarchy, ensure the order is:
- HealthUI
- DamageImage
- ScreenFader
- GameOverText
- ScoreText
1. Select ScreenFader in the Hierarchy
2. Set the Color’s alpha property in the Image component to 0
3. Select GameOverText in the Hierarchy
4. Set the Color’s alpha property in the Text component to 0
1. Reselect HUDCanvas in the Hierarchy
2. Go to Window > Animation and dock the panel
3. Click the Add Curve button
4. In the Create Animation dialog, choose the Animation folder as destination and name it GameOverClip (note that Unity creates an Animator Controller too)
1. Add Curve for GameOverText > Text > Color
2. Add Curve for GameOverText > RectTransform > Scale
3. Add Curve for ScreenFader > Image > Color
4. Add Curve for ScoreText > RectTransform > Scale
5. Select and move all end keyframes to 0:30
1. Move the playhead in the timeline to 0:20, select the GameOverText > RectTransform > Scale curve & press K to add a keyframe / click the Add Keyframe button
2. Move to frame 0, select GameOverText > RectTransform > Scale, set values to 0 in Inspector
1. Select all Keyframes, move them so that they begin at 1:30 (frame 90) in the timeline
2. Disable Record mode
1. In the Project panel Animation folder, select GameOverClip, in the Inspector, uncheck Loop time
2. In the Project panel Animation folder, select the HUDCanvas animator controller that was created
3. Double-click this asset to load it into the Animator window
1. In the Animator window, right-click empty space and choose Create State > Empty
2. Rename the state Empty at the top of the Inspector
3. Right-click the Empty state and Create Transition to the GameOverClip state by selecting it
4. Create a new Animator Trigger parameter GameOver
1. Right-click Empty state, Set As Default
2. Select the transition from Empty to GameOverClip
3. In the Inspector, set the Condition to GameOver
4. Select the HUDCanvas in Hierarchy, and in the Scripts > Managers folder of the Project, drag and drop GameOverManager to assign it to HUDCanvas
1. In the Scripts > Managers folder of the Project, open GameOverManager to view it
2. Close the script and return to the Unity editor
3. Drag the Player from the Hierarchy to the Player Health variable of the Game Over Manager (Script) component
1. File > Save Scene, File > Save Project
2. Press Play to test your game
3. Shoot some Zombie Toys!
References
- Nightmares: Unity Survival Shooter tutorial http://unity3d.com/learn/tutorials/projects/survival-shooter
Nessun commento:
Posta un commento